Grunge Texture Brushes for Procreate
Digital art often suffers from looking too clean. When every line is perfect and every color block is solid, the result can feel sterile or artificial. This is where Grunge Texture Brushes for Procreate become an essential tool in your creative arsenal. By introducing organic imperfections, grain, and atmospheric depth, these brushes bridge the gap between digital precision and traditional tactile feel. Whether you are a professional illustrator, a hobbyist sketcher, or a graphic designer working on branding materials, adding texture is one of the fastest ways to elevate the quality of your work.
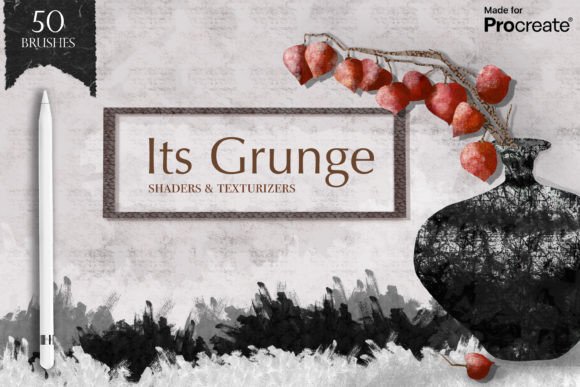
The appeal of this specific pack lies in its versatility. It is not limited to a single aesthetic. Instead, it complements a wide range of styles, including modern, minimal, flat, realistic, traditional, and contemporary art. With fifty unique brushes dedicated to shading and texturizing, you gain the ability to transform simple shapes into complex, engaging visuals with minimal effort.
Why Texture Matters in Digital Illustration
Texture serves several critical functions in visual design. Primarily, it adds depth. A flat color field exists on a single plane, but a textured surface suggests volume, weight, and materiality. When you apply gritty effects or blended gradients, you guide the viewer’s eye and create a sense of atmosphere that pure vector lines cannot achieve alone.
For creators working in hyperrealism, texture is non-negotiable. Skin pores, fabric weaves, and weathered surfaces require nuanced brushstrokes that mimic real-world physics. Conversely, in flat design or minimalism, subtle grain can prevent the artwork from looking like a generic template. It adds a layer of sophistication and warmth, making the piece feel hand-crafted rather than machine-generated.
The Grunge Shader Texture Pack for Procreate addresses these needs by providing tools specifically optimized for the Apple Pencil. Pressure sensitivity is crucial here. It allows you to control the intensity of the grain or the opacity of the shadow simply by varying how hard you press. This level of control ensures that your textures look natural and integrated, rather than stamped on top of the artwork.
Versatility Across Art Styles
One of the strongest advantages of this brush set is its adaptability. Many texture packs are designed exclusively for grunge or distressed looks, limiting their utility. However, these fifty brushes cover a broad spectrum of materials and effects.
- Organic Textures: Ideal for nature scenes, character illustrations, and traditional media emulation.
- Rough Grains: Perfect for adding noise to backgrounds, creating vintage poster effects, or simulating paper tooth.
- Smooth Shadows: Essential for soft lighting, ambient occlusion, and blending colors seamlessly.
- Metallic Surfaces: Useful for industrial design sketches, sci-fi concepts, and luxury product mockups.
This variety means you do not need to switch between multiple apps or purchase separate packs for different projects. A single toolkit can handle a whimsical children’s book illustration today and a sleek, contemporary logo design tomorrow. The ability to create awesome shades and textures easily allows you to maintain a consistent workflow regardless of the project’s stylistic demands.
Practical Applications for Professionals and Hobbyists
Understanding how to integrate these tools into your daily routine can significantly boost your productivity. For marketers and small business owners, textured graphics stand out in crowded social media feeds. A promotional image with a subtle concrete overlay or a paper grain effect feels more tangible and trustworthy than a glossy, over-produced photo.
Educators and bloggers can use these brushes to create engaging headers and diagrams. Adding a handwritten, textured feel to educational materials makes them appear more approachable and less corporate. Freelancers will appreciate the time saved by having pre-optimized shaders. Instead of spending hours creating custom brushes or searching for stock overlays, you can apply the desired effect directly within Procreate.
Even for casual users, the fun factor is significant. Experimenting with different grit levels and shadow types can inspire new creative directions. You might start with a simple shape and discover that a specific rough grain transforms it into something entirely new, sparking ideas for larger compositions.
How to Use Grunge Texture Brushes Effectively
To get the most out of the Grunge Texture Brushes for Procreate, it is helpful to understand two primary methods of application. You can use the brushes directly on your canvas, painting freely as you would with a standard pencil or ink tool. This method is intuitive and works well for sketching and direct rendering.
However, for more controlled and non-destructive editing, using Procreate’s layer features is recommended. Specifically, Clipping Masks and Alpha Lock allow you to apply textures only to specific areas without affecting the rest of your composition. Here is a practical guide to getting started:
Method 1: Using Clipping Masks
This technique is ideal when you want to add texture to an existing shape without going outside its boundaries.
- Select the Base Layer: Choose the layer containing the object or color block you wish to texture.
- Create a New Layer: Tap the plus icon to add a new layer directly above your base layer.
- Enable Clipping Mask: Tap the new layer and select "Clipping Mask" from the menu. You will see a downward arrow indicate that this layer is now confined to the pixels of the layer below it.
- Apply the Brush: Select any brush from the grunge pack. As you paint on the clipping mask layer, the texture will only appear where the base layer has content. This allows you to experiment with heavy grains or dark shadows safely, knowing they will not spill into the background.
Method 2: Using Alpha Lock
Alpha Lock is useful when you want to modify the texture of the layer itself rather than adding a new layer on top.
- Select the Layer: Tap the layer you want to texture.
- Activate Alpha Lock: Swipe right with two fingers on the layer thumbnail or select "Alpha Lock" from the menu. The layer thumbnail will display a checkerboard pattern.
- Paint Directly: Choose your desired grunge brush and paint directly on the layer. The texture will replace or blend with the existing pixels, maintaining the original shape’s boundaries perfectly.
Important Considerations Before You Start
While these brushes are designed to be user-friendly, a few tips will help you avoid common pitfalls. First, remember that less is often more. Over-texturing can make an image look muddy or chaotic. Start with low opacity and build up the effect gradually. Second, consider the resolution of your canvas. High-detail grains may look different on a small web graphic versus a large print file. Always test your brushes at the final output size.
Finally, explore the full range of the fifty brushes. It is easy to find one or two favorites and stick with them, but rotating through different shaders keeps your portfolio fresh and diverse. By mastering these tools, you unlock the ability to add professional-grade depth and atmosphere to any project, ensuring your digital art always feels alive and authentic.